The practical no frills guide.
The kitchen waste disposal unit is a convenient appliance that helps keep your kitchen clean and efficient. However, when a disposal unit encounters issues, it can disrupt your daily routine and lead to unpleasant odours or even kitchen plumbing problems.
In Mastering kitchen waste disposal repair – the no frill guide, we’ll look at common problems with kitchen waste disposal units, give you a step-by-step diagnostic processes, as well as repair solutions.
Whether you’re dealing with a jammed unit, strange noises, or complete malfunction, this guide will give you the knowledge to troubleshoot and repair your garbage disposal with confidence.
Before undertaking any/all plumbing, heating or related work you should always take your own independent professional advice.

Plumber - Paul
Paul's a member of the Chartered Institute of Plumbing & Heating Engineers, Water Regs UK (formerley WRAS – Water Regulations Advsiory Scheme) certificated as well as a qualified unvented cylinder engineer and a qualified heat pump engineer.
Understanding how kitchen waste disposal units work
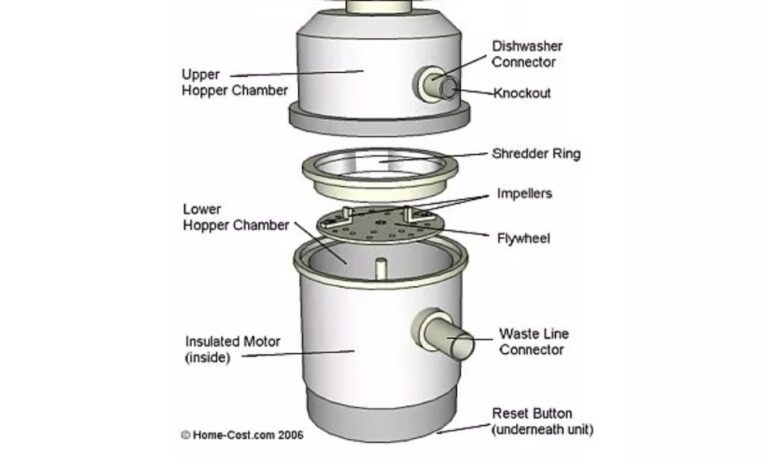
Before delving into troubleshooting and repair, it’s essential to have a basic understanding of how kitchen waste disposal units operate. These units are installed under the kitchen sink and are designed to shred food waste into small particles, allowing it to pass through the plumbing system easily. Key components include:
Motor. Powers the disposal unit and drives the grinding mechanism.
Grinding mechanism. Consists of rotating impellers or blades that shred food waste.
Hopper or grinding chamber. Where food waste is deposited for grinding.
Anti-jamming features. Some units are equipped with features to prevent and alleviate jams.
Common kitchen waste disposal problems
Jammed disposal unit
Symptoms
Unit makes a humming sound but doesn’t grind or is difficult to turn manually.
Possible causes
Foreign objects (utensils, bones, etc.) causing a jam.
Excessive amounts of fibrous or starchy foods.
DIY repair
Turn off the disposal and unplug it.
Use a hex key or disposal wrench to manually rotate the grinding mechanism and dislodge the jam.
If the jam persists, consider using a jam-buster tool or calling a professional.
Loud or unusual noises
Symptoms
Grinding noises, metallic sounds, or rattling during operation.
Possible causes
Loose or damaged internal components.
Foreign objects caught in the grinding mechanism.
DIY repair
Turn off the disposal and inspect for any loose or damaged components.
Use a flashlight to look into the grinding chamber for foreign objects and remove them.
If the noise persists, consider professional assistance.
Leaking disposal unit
Symptoms
Water pooling under the sink or around the disposal.
Possible causes
Loose or damaged connections.
Cracks or holes in the disposal unit.
DIY repair
Check all connections and tighten any loose screws or bolts.
Inspect the disposal unit for visible cracks or damage. If found, replacement may be necessary.
Unit doesn’t turn on
Symptoms
No response when the disposal is switched on.
Possible causes
Electrical issues.
Overheating or motor failure.
DIY repair
Check if the disposal is properly plugged in and the circuit breaker is not tripped.
Press the reset button on the bottom of the unit.\
If the unit still doesn’t turn on, it may be an electrical or motor issue, requiring professional attention.
Foul odours from the disposal
Symptoms
Unpleasant smells emanating from the disposal.
Possible causes
Accumulation of food debris.
Bacterial growth in the disposal.
DIY repair
Grind citrus peels, ice cubes, or baking soda to freshen up the disposal.
Run cold water for a few minutes after each use to help flush out debris and prevent odours.
Tools you'll need for kitchen waste disposal repair
To effectively troubleshoot and repair a kitchen waste disposal unit, having the right tools is essential. Here’s a list of tools commonly used in garbage disposal repairs:
- Hex key (Allen Wrench). For manually rotating the disposal mechanism.
- Disposal spanner or wrench. Specifically designed to fit into the disposal’s bottom to manually rotate the impellers.
- Torch. For inspecting the grinding chamber for foreign objects.
- Jam-buster tool (optional). A specialised tool to help dislodge stubborn jams.
- Plunger. Used for minor clogs or jams.
- Bucket. To catch water or debris during repairs.
Kitchen waste disposal repair - step by step
Jammed disposal repair
Turn off the disposal and unplug it.
Use a hex key or disposal wrench to manually rotate the grinding mechanism.
If the jam persists, use a jam-buster tool or call for professional assistance.
Loud or unusual noises repair
Turn off the disposal and inspect for loose or damaged components.
Use a flashlight to check for and remove any foreign objects in the grinding chamber.If the noise persists, consider professional assistance.
Leaking disposal repair
Check and tighten all connections.
Inspect the disposal unit for visible cracks or damage. Replace if necessary.
Unit doesn’t turn on repair
Check if the disposal is plugged in and the circuit breaker is not tripped.
Press the reset button on the bottom of the unit.
If the unit still doesn’t turn on, seek professional assistance.
Foul odours repair
Grind citrus peels, ice cubes, or baking soda to freshen up the disposal.
Run cold water for a few minutes after each use to help prevent odours.
5 preventative maintenance tips
1. Run cold water during use
Always run cold water while using the disposal to help flush out debris and prevent overheating.
2. Avoid hard or fibrous foods
Refrain from disposing of hard items (bones, fruit pits) and fibrous foods (celery, onion peels) to prevent jams.
3. Regular cleaning
Grind citrus peels, ice cubes, or baking soda periodically to keep the disposal fresh and clean.
4. Use mild dish soap
Pour a small amount of mild dish soap down the disposal and run it with cold water to help break down grease and keep the mechanism clean.|
5. Schedule professional maintenance
Consider scheduling professional maintenance to inspect and clean the disposal periodically.
Signing-off
A well-functioning kitchen waste disposal unit is a valuable asset in any home.
With the knowledge and tools provided in this no frills mastering kitchen waste disposal guide, homeowners can confidently troubleshoot and repair common issues, ensuring their disposal units operate smoothly.
Regular preventive maintenance, such as running cold water, avoiding improper disposal, and periodic cleaning, can significantly contribute to the longevity and efficiency of the appliance.
By mastering the art of waste disposal troubleshooting and repair, you’ll not only maintain a clean and efficient kitchen but also save on potential repair costs in the long run.
And if you’d like some help fixing your kitchen waste disposal unit from our local Caversham plumbers near me, we’d be pleased to. We’re only a phone call, text, WhatsAp or email away!
AngusPLUMBING
(Caversham’s #1 plumbers)
Disclaimer
Our mastering series and blog are provided on an “as is” basis, in good faith and subject to change without notice. All reasonable efforts have been made to ensure its accuracy. However, this isn’t warrantied, and liability isn’t accepted for any damage or loss whether direct, indirect, special or consequential suffered by anyone in accessing, downloading, using or relying on it.
More from our Mastering - no frills series....