The practical no frills guide.
Before undertaking any/all plumbing, heating or related work you should always take your own independent professional advice.
The humble toilet, an essential fixture in every household, plays a crucial role in our daily lives.
However, like any mechanical system, toilets are prone to wear and tear, leading to issues that may require repair.
Whether you’re dealing with a running toilet, a stubborn clog, or a mysterious leak, understanding the ins and outs of toilet repair can save you both money and frustration.
In Mastering toilet repair – the practical no frills guide, we’ll take a deep dive into the world of toilet repair, look at the anatomy of toilets, delve into common issues, and cover everything from diagnosing common problems to advanced troubleshooting and expert fixes. Step by step.

Plumber - Paul
Paul's a member of the Chartered Institute of Plumbing & Heating Engineers, Water Regs UK (formerley WRAS – Water Regulations Advsiory Scheme) certificated as well as a qualified unvented cylinder engineer and a qualified heat pump engineer.
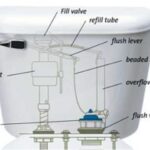
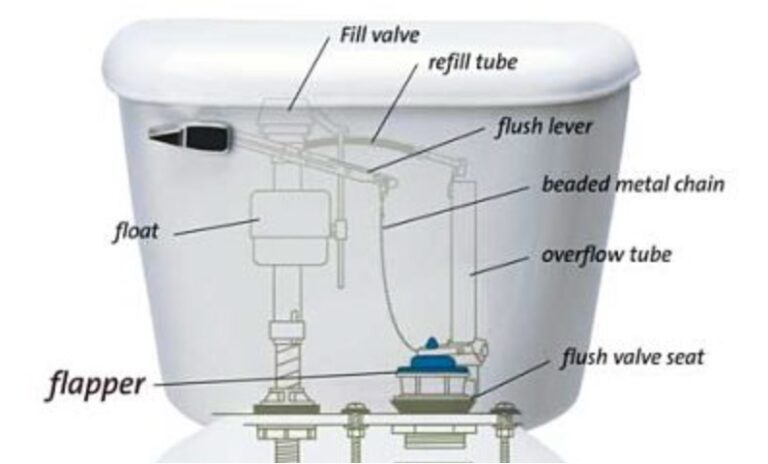
Anatomy of a toilet
To embark on a successful toilet repair journey, it’s essential to know what you’re dealing with and the key components that make up a standard toilet.
Understanding the anatomy is the first step to diagnosing exactly what’s not working so that you can decide on the best way to fix it and get it back in action. The primary components include:
Tank. The upper part of the toilet that holds water before a flush.
Bowl. The lower part of the toilet where waste is deposited and flushed.
Flush valve. The mechanism that releases water from the tank into the bowl during flushing.
Fill valve. Regulates the water level in the tank after flushing.
Flapper. A rubber mechanism that seals the flush valve, allowing water to enter the bowl during a flush.
Overflow. Prevents overfilling of the tank.
Wax ring. Seals the connection between the toilet and the drainpipe (US toilets).
Bolts and seals. Secure the toilet to the floor and maintain a watertight seal.
Common toilet problems and DIY solutions
Running toilet
Symptoms. Continuous running water in the bowl.
Possible causes
- Faulty flapper allowing water to leak from the tank to the bowl.
- Incorrect water level in the tank.
DIY solutions
- Adjust the water level by using the float adjustment screw on the fill valve.
- Check the flapper for proper seating and replace it if necessary.
Clogged toilet
Symptoms. Water doesn’t drain or drains very slowly.
Possible causes
- Build up of waste and debris in the drainpipe.
- Foreign objects causing obstruction.
DIY solutions
- Use a plunger to clear minor clogs.
- If the clog persists, use a toilet auger or snake to break up and remove the obstruction.
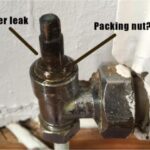
Leaking toilet
Symptoms. Water pooling around the base of the toilet.
Possible causes
- Loose or damaged bolts securing the toilet to the floor.
- Worn-out wax ring.
DIY solutions
- Tighten the bolts at the base of the toilet.
- Replace the wax ring by following the manufacturer’s instructions.
Weak flush
Symptoms. Inadequate flushing power.
Possible causes
- Incorrect water level in the tank.
- Mineral buildup in the rim holes.
DIY solutions:
- Clean out any mineral deposits in the rim holes.
- Replace the flapper if it is worn.
Noisy toilet
Symptoms. Strange sounds during or after flushing.
Possible causes
- Debris or wear in the fill valve.
DIY solutions
- Inspect the fill valve for debris.
- Consider replacing the fill valve if the noise continues.
Essential tools for toilet repair
To successfully repair a toilet, it’s crucial to have the right tools on hand. Here’s a list of tools you’ll need:
Plunger. Essential for clearing most toilet clogs.
Toilet auger or snake. Used for stubborn clogs deeper in the drainpipe.
Adjustable spanner or wrench. Necessary for tightening or loosening bolts.
Screwdriver. For removing screws and accessing components.
Plumber’s tape (ptfe). Creates a watertight seal on threaded connections.
Bucket. Useful for catching excess water during repairs.
Gloves. Protect your hands from dirt and potential contaminants.
Replacement parts. Flapper, fill valve, wax ring, bolts, and other parts specific to your toilet model.
Toilet repair - step by step
Turn off the water supply
Locate the shut-off valve behind or beside the toilet.
Turn the valve clockwise to stop the water flow.
Flush the toilet
Flush the toilet to drain most of the water from the tank and bowl.
Remove the tank lid
Take off the tank lid and set it aside in a safe place.
Diagnose the issue
Inspect the components inside the tank.
Look for visible issues such as a misaligned flapper, a broken chain, or a waterlogged float.
Fixing a running toilet
Adjust the water level by using the float adjustment screw on the fill valve.
If the flapper is damaged or worn, replace it.
Addressing clogs
Use a plunger for minor clogs.
For stubborn clogs, insert a toilet auger into the drain opening and turn the handle to break up and clear the obstruction.
Dealing with leaks
Tighten the bolts at the base of the toilet.
If leaks persist, replace the wax ring by following the manufacturer’s instructions.
Restoring a weak flush
Adjust the water level in the tank to the recommended level.
Clean out any mineral deposits in the rim holes.
Replace the flapper if needed.
Silencing a noisy toilet
Inspect the fill valve for debris.
Consider replacing the fill valve if the noise continues.
5 Advanced toilet repair techniques
While many toilet issues can be resolved with basic DIY techniques, some problems may require more advanced solutions. Here are a few advanced techniques for experienced DIYers:
Replacing the fill valve
If the fill valve is malfunctioning or damaged beyond repair, it may need to be replaced.
Turn off the water supply and follow the manufacturer’s instructions for installing a new fill valve.
Upgrading the flushing mechanism
Consider upgrading to a dual-flush system to save water.
Follow the manufacturer’s instructions for retrofitting your toilet with a dual-flush kit.
Fixing a cracked tank or bowl
If you discover a crack in the tank or bowl, it’s often best to replace the entire toilet.
Follow proper disposal and installation procedures, or seek professional help.
Dealing with persistent clogs
If clogs persist despite using a plunger or toilet auger, a more extensive drain cleaning may be necessary.
Consider using a sewer auger or enlisting the help of a professional plumber.
5 Preventive toilet maintenance tips
Regular inspections
Conduct routine checks for leaks, cracks, or other issues.
Check the tank components for wear and tear.
Avoiding clogs
Only flush toilet-friendly items.
Keep a rubbish bin in the bathroom for non-flushable items.
Proper water level
Ensure the water level in the tank is set to the manufacturer’s recommended level.
Timely repairs
Address any issues promptly to prevent them from escalating.
Use toilet-friendly products
Avoid using harsh chemicals that can damage the internal components of the toilet.
Use toilet paper that is safe for septic systems.
Toilet fixtures and fittings
Always choose fixtures fittings that are WRAS (Water Regulations Advisory Scheme) approved – the approval scheme of the UK Water Industry. This ensure that these are of the highest quality and meet the requirements of the Water Supply (Water Fittings) Regulations 1999 and amendments.
You’ll find the WRAS logo on the packaging and in the product description. If it’s not there, you risk fitting cheaply made fixtures and fittings and these will need more maintenance, and replacing far sooner.
Signing-off
Mastering the art of toilet repair is an empowering skill for homeowners. From diagnosing common problems to executing both basic and advanced repairs, this mastering no frills guide provides the knowledge needed to tackle a wide range of toilet issues.
Remember, a well-maintained toilet not only ensures the smooth functioning of your household plumbing but also contributes to water conservation and the overall comfort of your home. Armed with the right tools, a bit of know-how, and a willingness to get your hands dirty, you can confidently face any toilet repair challenge that comes your way.
And if you’d like some help fixing your toilet from our local Caversham plumbers near me, we’d be pleased to. We’re only a phone call, text, WhatsAp or email away!
AngusPLUMBING
(Caversham’s #1 plumbers)
Disclaimer
Our mastering series and blog are provided on an “as is” basis, in good faith and subject to change without notice. All reasonable efforts have been made to ensure its accuracy. However, this isn’t warrantied, and liability isn’t accepted for any damage or loss whether direct, indirect, special or consequential suffered by anyone in accessing, downloading, using or relying on it.
More from our Mastering - no frills series....