Easy fix valves, pinholes and more!!

Plumber - Paul
Paul's a member of the Chartered Institute of Plumbing & Heating Engineers, Water Regs UK (formerley WRAS – Water Regulations Advsiory Scheme) certificated as well as a qualified unvented cylinder engineer and a qualified heat pump engineer.
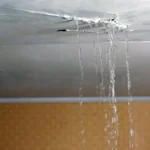
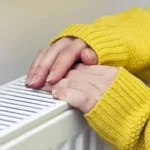
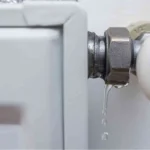
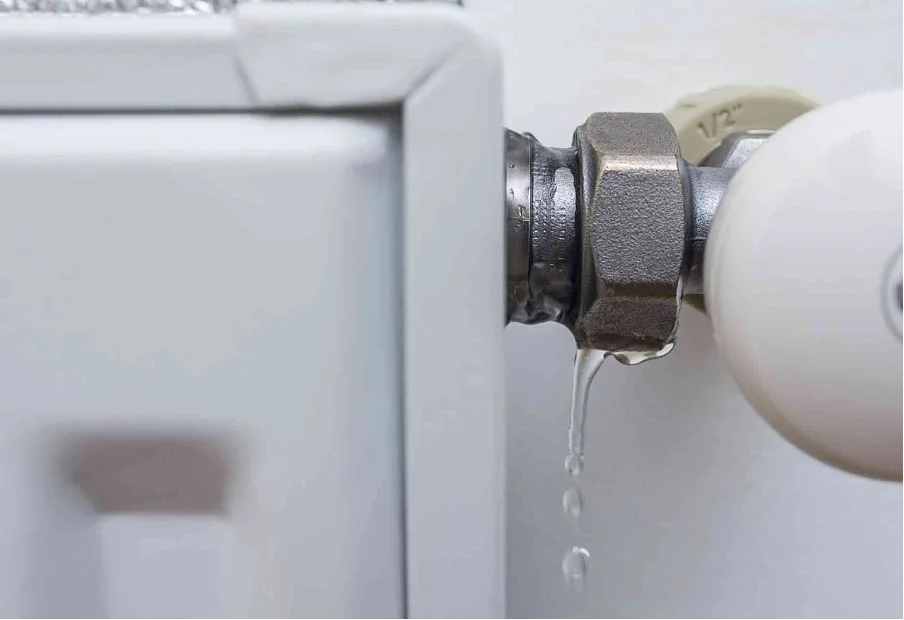
Is there a pool of water collecting under your radiator?
If there is, it’s time to act. A leaking radiator is not a good thing and can lead to water damage – to your walls, floors, and ceilings, mould growth, and higher water as well as energy bills. Luckily, fixing a leaking radiator is a relatively easy DIY job that can save you money and hassle in the long run.
In this blog, we’ll go through step-by-step how to fix a leaking radiator so that you can get your home back to normal as quickly as possible. We’ll cover the tools and materials you’ll need, how to find the leak, how to drain the system, how to fix the leak, and how to refill and bleed the radiator.
What causes a radiator to leak?
Let’s get going by taking a look at the most common things that can lead to a leaking radiator:
- Corrosion – Over time, the inside of the radiator can corrode and rust, which can cause leaks to develop.
- Damaged radiator – A damaged radiator, just like a cracked or split pipe, can cause water to leak out.
- Faulty valves – Faulty valves can cause water to leak out of the radiator. This is usually caused by a problem with the valve stem or valve body.
- High Pressure – High pressure in the heating system can cause leaks to develop with central heating water forcing itself out of the system at weak points.
Step 1 – Tools and materials you’ll need to fix the leak
Before you start fixing your leaking radiator, you’ll need to gather the necessary tools and materials. Here’s a list of everything you’ll use:
- Radiator key
- Towel or rag
- Bucket
- Plumber’s tape (PTFE)
- Pipe spanner or adjustable wrench
Once you’ve all these items, you’re ready to start fixing your leaking radiator.
Step 2 – Locating the leak
The first thing to do in fixing a leaking radiator is to find the source of the leak. This can be tricky, as leaks can be caused by a variety of things, including corrosion, a faulty valve, or a cracked pipe. Here’s how we’d go about finding the leak:
- Turn off the heating system – Before you start inspecting the radiator, make sure you turn off the heating system. This’ll prevent any hot water from coming out of the radiator and potentially scolding you.
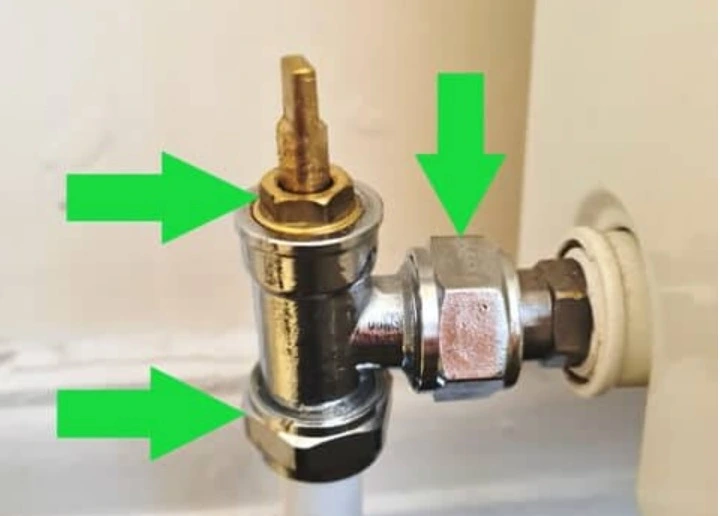
- Inspect the radiator – Look for any signs of water around the radiator. This includes damp spots on the wall, water stains on the floor, or puddles of water near the base of the radiator. NB. the most common place for a radiator to leak is at the valve or the pipe fittings.
- Check the valves – Closely inspect the valves at the top and bottom of the radiator for any signs of leaks. If you notice water dripping from the valve, it’s likely that the valve needs to be replaced.
- Look for rust or corrosion – Check the radiator for any signs of these. If you notice any, it’s likely that the leak is caused by a corroded or cracked pipe.
Once you’ve found the leak, you’re ready to start fixing it.
Step 3 – Drain the radiator
Before you get going, you’ll need to drain the radiator. To do this, place a bucket or tray underneath the radiator valve and turn the valve clockwise until the water starts to drain out. You’ll need to use a radiator key to turn the valve.
Step 4 – If it’s the valve or pipe fittings
Tighten the valve
If the leak is coming from the valve, the first thing to try is tightening the valve. Use an adjustable spanner to tighten the valve clockwise. Be careful not to over-tighten the valve as this can damage the valve or radiator.
Check the valve stem
With the handle removed, inspect the valve stem for any sign of damage or wear. If the stem’s damaged, you’ll need to replace the valve. If it’s just worn, you may be able to repair it by tightening the packing nut or replacing the packing.
The packing nut is the nut located just below the handle. Use a spanner to tighten it clockwise to see if it stops the leak. If it doesn’t, you’ll need to replace the packing. To do this, remove the packing nut and slide the old packing off the stem. Replace it with a new packing material and put the valve back together
Replace the valve
If tightening the valve doesn’t fix the leak, the next step is to replace the valve. You can buy replacement radiator valves from your local DIY store or plumbing supplier.
To replace the valve, you’ll need to remove the old valve and fit the new one in its place. Make sure you use the correct tools and follow the manufacturer’s instructions, carefully. Also, clean the valve and the surrounding area of the radiator before you install the new valve. A wire brush or sandpaper will help to remove any dirt, rust, or debris that may have accumulated over time. You should also use a cloth or brush to clean the threads on the radiator and valve to ensure a tight seal.
Another cloth should be used to protect the radiator from any scratches or damage caused by the spanner. Make sure the valve is properly aligned and tightened to prevent any leaks.
Test the valve
After installing the new valve, you need to test it to make sure it is working properly. To do this, you need to turn on the heating system and check for any leaks or drips around the valve. If there aren’t any leaks, you can turn off the heating system and close the bleed valve. If there are leaks, you may need to tighten the nut further or replace the valve entirely.
Tighten the pipe fittings
If the leak is coming from one of the pipe connections or joints, it may simply need to be tightened. Use an adjustable spanner or pliers to tighten the connection but be careful not to over tighten it. If the connection is already tight, it may need to be sealed with plumber’s putty or Teflon (PTFE) tape.
If this doesn’t stop the leak you may need to replace the faulty or damaged fittings. To replace the parts, you will need to cut the damaged section of pipe and replace it with a new section. Use a pipe cutter to cut the pipe and make sure the new section fits securely into place. Use a sealant to ensure that it’s watertight. This can be a more complex job and may require the help of a plumber.
If you’re confident in your DIY skills, you can buy replacement fittings from your local DIY store or plumbing supplier and follow the manufacturer’s instructions to replace them.
If it’s not the valve or fittings?
If the radiator itself is leaking, it may be damaged and need to be replaced. Look for signs of rust or corrosion on the radiator, as well as any cracks or holes. If the damage is minor, you may be able to patch it with radiator sealant – see fixing a radiator pinhole below. If it’s more severe, you’ll need to replace the radiator.
Step 5. Once the leak is fixed – refill the radiator and bleed
Once you’ve fixed the leak, it’s important to check the radiator for any other leaks. If there aren’t any turn the heating system back on and check the radiator for any signs of water or damp patches.
If you notice any other leaks, repeat the steps above to fix them. Following this it’s time to refill the radiator. Use a funnel to pour water into the radiator, taking care not to overfill it. Once the radiator is full, close the valve at the bottom of the radiator.
When the leak’s fixed and you’ve checked the radiator for any other leaks and filled it, you’ll need to bleed the radiator to remove any air bubbles. To do this, turn off your heating system and place a radiator key in the bleed valve on the radiator. Turn the key anti-clockwise until you hear a hissing sound. This means the air is being released from the radiator. When water starts to come out of the valve, tighten the valve clockwise. If your radiator valve does not use a key fitting and has a slotted head – click here.
Step 6. Turn on the heating system
After you’ve bled the radiator, turn on your heating system and check that the radiator is heating up correctly. If the radiator isn’t getting hot, there may be a problem with the heating system or the radiator itself. In this case, it’s best to call a plumber to diagnose and fix the problem.
Step 7. Monitor the radiator
After you’ve fixed the radiator valve leak, it’s important to regularly check the radiator to ensure that the leak doesn’t return. If you notice any signs of a leak, such as wet spots on the flooring or walls, you’ll need to repeat the repair process or call a plumber to sort the problem out.
What you can do to prevent radiator valve leaks
Radiator valves are an important component of your heating system, and they play a crucial role in regulating the flow of hot water or steam to the radiators. Over time, radiator valves can develop leaks, which can cause water damage to your home, increase your energy bills, and reduce the efficiency of your heating system.
Understanding radiator valve leaks
Before we dive into how to prevent radiator valve leaks, let’s first understand what causes them. Radiator valves control the flow of hot water into the radiator, which allows the radiator to heat up and warm the surrounding area. The valve typically has two parts – the body and the head. The body connects to the radiator, and the head controls the flow of water.
There are many reasons why radiator valves may leak. Some of the most common include:
- Damaged valve seals – Over time, the rubber seals in the valve can wear out, leading to leaks.
- Loose fittings – If the fittings connecting the valve to the radiator are loose, water can escape and cause leaks.
- Corrosion – This can occur on the valve body or fittings, causing water to escape and leading to leaks.
- High water pressure – Over stressing valves, will lead to leaks.
Correct installation
Proper installation of radiator valves is essential to prevent leaks. When putting in new valves or replacing old ones, the manufacturer’s instructions should always be followed carefully and to the letter. This includes using the correct tools, ensuring that the valves are installed securely, and sealing any gaps or joints with high-quality sealant.
Regular radiator valve maintenance
One of the best ways to prevent radiator valve leaks is by performing regular maintenance. This means checking the valves periodically for any signs of wear or damage. Valves can become corroded over time, and this can cause leaks. If you notice any signs of corrosion, such as rust or discolouration, replace the valve as soon as possible. Regular maintenance also involves cleaning the valves to remove any debris or build-up that can cause blockages and reduce the flow of water.
Use the right radiator valve
Choosing the correct radiator valve is key to being leak free and saving money. There are different types of radiator valves available, including manual and thermostatic valves and you should choose according to your need, budget and of course energy saving requirements. Manual valves are simple to use and cost-effective, but they don’t allow precise temperature control. Thermostatic valves, on the other hand, are more advanced and enable you to set the desired temperature for each room. They’re more expensive than manual valves but will help save energy and prevent leaks by regulating the flow of hot water to the radiator.
Use the right tools
When working on your radiator valves, it’s important to use the right tools. If you don’t, you risk damaging the valves and causing leaks. For example, using pliers instead of a valve key – which will damage the valve stem, causing it to leak. Always make sure you’ve the right tools for the job before you start working on your radiator valves.
Check for leaks
Regularly looking for leaks will help to prevent major problems later on. Take your time to find any and all signs of leakage, such as water stains or puddles around the radiator. If you notice any of these, it is important to act immediately otherwise you may be left with even more water damage to deal with and a hefty bill.
Don’t over-tighten
Another common cause of radiator valve leaks is over-tightening. It’s important to tighten the valve enough to prevent leaks, but not so much that you damage the valve or cause it to leak. Use a valve key to tighten the valve to the manufacturer’s recommended torque specification. Over-tightening can also cause the valve to become stuck in the closed position, which can stop the radiator from heating up.
Replace old valves
If your radiator valves are old or damaged, it’s important to replace them. Old valves can become corroded, which can cause leaks. Valves that are damaged or worn can also cause leaks. If you notice any signs of damage or wear on your valves, it’s time for some new ones.
Use pipe sealant
Applying pipe sealant is another way to prevent radiator valve leaks. Pipe sealant is a type of adhesive that is used to create a tight seal between the valve and the pipe. Apply a small amount of pipe sealant to the threads of the valve before you tighten it. This’ll help create a tight seal and stop water flowing through the thread.
Install a leak detector
Putting in a leak detector will help prevent major water damage in case of a leak. A leak detector will let you know if there’s a leak in your heating system, allowing you to act before it causes major damage. There are many different types of leak detectors available, including water alarms, sensors, and automatic shut-off valves. Each has its advantages – one for another day.
Check the pressure regularly
Checking the pressure in your heating system is essential to prevent leaks and other issues from developing over time. Low pressure can cause the valves to fail or leak, while high pressure can cause them to crack or break.
To check the pressure in your heating system, use a pressure gauge or ask a plumber. If the pressure is too high or too low, they’ll be able to adjust it and ensure that your heating system is working correctly and without leaks.
Install pressure reducing valves
High water pressure can cause radiator valves to leak. If this is too high, it’s you should install pressure reducing valves. These are designed to reduce the water pressure in your home, which can prevent leaks and other plumbing problems.
Keep the heating system balanced
Maintaining your heating system balance is another effective way to prevent radiator valve leaks. This involves ensuring that all radiators in your home receive the same amount of heat, preventing any one radiator from becoming overworked or overheated.
Overworked radiators can cause the valves to fail or leak, leading to costly repairs. To balance your heating system, you may need to adjust the valves on individual radiators or use a balancing valve to regulate the flow of water through the system.
Don’t use excessive force
When working on your radiator valves, it’s important not to use too much force. Applying excessive force can cause the valve to become damaged or break, which can cause leaks. Use a firm but gentle touch when working on your valves, and don’t force them if they don’t turn easily.
Bleed your radiators
Bleeding your radiators is another way to prevent leaks. Air can become trapped in your radiator system, which can cause blockages and reduce the flow of water. This in turn can cause your valves to leak. Bleeding your radiators involves releasing the trapped air, which can improve the flow of water and prevent leaks.
Install radiator valve covers
Another way to prevent radiator valve leaks is to install valve covers. Valve covers are designed to protect your valves from damage and debris, reducing the risk of leaks and other problems. Valve covers are available in a range of sizes and styles, so make sure when your at the DIY store you choose the right type for your valves.
Install Thermostatic Radiator Valves
If you’re looking to save money on your heating bill and improve your home’s energy efficiency, thermostatic radiator valves (TRVs) are a great way to do this. TRVs help regulate the temperature of individual rooms in your home by controlling the flow of hot water to each radiator. This’ll enable you to heat different rooms and different parts of rooms to different temperatures and change this easily when needed so that you get the exact warmth required.
Choosing the Right Thermostatic Radiator Valve – Before you start installing TRVs, make sure that you choose the right ones for your home. There are several types of TRVs available on the market, so it’s important to pick the ones that are suited for your particular needs.
This means making sure that you choose a type that works with your heating system (combi boiler or central heating system), work with your radiator(s) and provide the control you want i.e. a general temperature range or allow you to program specific temperatures for different times of day.
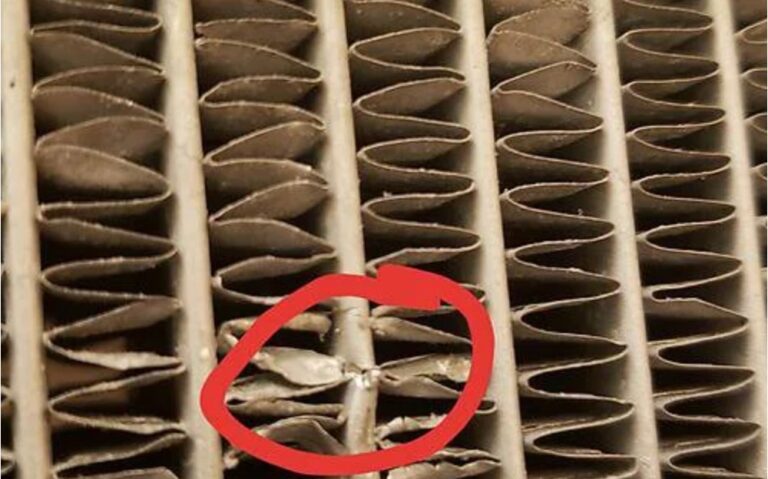
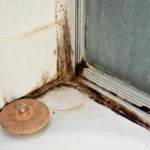
Pin hole leaks – what are they? How do you fix one?
Unfortunately, like any other mechanical device, a radiator can develop leaks. Pinhole leaks – a small hole in a radiator that allows water or steam to escape are usually caused by corrosion or damage to the radiator’s metal surface,
They’re a common problem in older radiators typically caused by corrosion or wear and tear with the metal.
These leaks while small may not seem like a big deal, can lead to larger problems over time, including water damage and higher energy bills. And can cause serious damage if left untreated.
How do I know if a radiator has a pinhole leak?
Pinhole leaks can be difficult to spot, but if you notice a drop in your heating system’s pressure, it could be a sign that there is a leak in your radiator.
Tools you’ll need
Before you start, have the following to hand:
- Safety glasses
- Gloves
- A small bucket or container
- A radiator repair kit
- A rag or towel
- A pair of pliers
- A hacksaw
- Sandpaper
- Epoxy putt
8 step for fixing a pinhole leak
Turn off the power and water supply
Before you begin, make sure that the power and water supply to the radiator are turned off. You can do this by shutting off the valve that controls the water supply to the radiator.
Drain the radiator
Once the power and water supply are turned off, you next need to drain the radiator. To do this, place a small bucket or container under the radiator’s drain valve and open the valve. Wait until all the water has drained out of the radiator before moving on to the next step.
Locate the pinhole leak
Now it’s time to find the pinhole leak. Look thoroughly over the entire radiator surface for any sign of corrosion or damage. If you are not able to locate a pinhole leak on a radiator’s front, use a small, angled mirror to check its back.
Remove the damaged section of the radiator
Once you’ve found the pinhole leak, use a hacksaw to remove the radiator’s damaged section taking care to not damage any of the surrounding pipes or fittings.
Clean the leak area and sand
Once the radiator is drained, clean the area around the leak using a wire brush or sandpaper to remove any rust or debris from the surface of the radiator. This’ll help the repair material adhere properly to the surface. Next using sandpaper smooth out the edges of the cut section of the radiator to ensure a good fit when you attach the repair kit.
Apply the epoxy putty and attach the repair kit
Now it’s time to apply the epoxy putty. Make sure that you read the instructions carefully before beginning. Epoxy putty is a two-part adhesive that’s mixed together and applied to the damaged area. Always follow the manufacturer’s instructions so that the epoxy putty is mixed correctly.
Once the putty has dried, you can attach the repair kit – a small metal plate that’s bolted over the damaged area of the radiator. Again, make sure that you carefully follow the manufacturer’s instructions.
Test the radiator
Once you’ve attached the repair kit, it’s time to test the radiator. Turn the water and power supply back on and check for any leaks. If the radiator is leak free, turn on your heating system and make sure that the radiator is heating up properly.
Monitor the radiator for any further leaks
Even after you have fixed the leak, it’s essential to regularly check the radiator for any further leaks. Look over the radiator regularly for any signs of water stains or discolouration. Additionally, keep an eye on your heating system’s pressure gauge to ensure that the pressure remains constant.
Top tips
- Wear protective gloves and eyewear when handling radiator repair materials.
- If the pinhole leak is in a hard-to-reach area, you may need to call a plumber for assistance.
- Regular maintenance and upkeep of your radiator will help prevent pinhole leaks from occurring in the first place. This includes flushing the radiator annually to remove sediment and debris build up.
- Keep an eye out for other signs of radiator damage, such as rust or discolouration, as these can also lead to leaks over time.
5 things that’ll help to prevent pinhole leaks
While pinhole leaks are a common problem in older radiators, there’s a few things that you can do to prevent them from happening in the future:
- Have your heating system serviced annually. Regular maintenance can help prevent pinhole leaks from developing.
- Use a water softener or better still an electrolytic or electromagnetic water conditioner.
- Perform regular checks on your heating system, including flushing the radiator and looking for signs of corrosion.
- Use high-quality pipes and fittings during installation to prevent leaks from occurring.
- Avoid physical damage to your radiator by keeping it away from heavy items or sharp objects.
If you notice any signs of a pinhole leak, such as rust or corrosion, take care of it quickly so that you prevent further damage.
Wrapping up....
Fixing a radiator leak can be a DIY project if you’re comfortable working with plumbing and heating systems. By following some simple steps you can repair a pinhole leak as well as valve and fitting leaks and prevent further damage to your home. Remember to take safety precautions, follow manufacturer’s instructions, and ask for professional help – if you need it.
See you soon....
That’s it for today! Until next time, you can always find us on www.angusplumbing.co.uk (we’ve a great on-line booking mechanism) or on Instagram, Facebook and YouTube. Or, if you wanted to, you can call, text or WhatsApp us on 07442 966664.
We’d love to hear from you, especially if there’s something, you’d like us to blog about.
All the best for now
The ANGUSplumbing team
More from our Blog....